Welcome to our store!
Customer Support [email protected]

Tripper Falcon II Sport

$3,050.00 $150.00

THE FIRST 2 SEATER ELECTRIC BIKEwith 500 lbs weight capacity+ MAG WHEELS ( $300 value) + HYDRAULIC DISC BRAKES ($200 value) + KAWASAKI FRONT SUSPENSION ($300)IN STOCK NOW !SAME DAY FREE SHIPPING FROM Los AngelesWE FINANCE EVERYONE! PAY AS LOW AS $99/MONTH!


SKU: M11403077 Category:

THE FIRST 2 SEATER ELECTRIC BIKE
with 500 lbs weight capacity

+ MAG WHEELS ( $300 value) + HYDRAULIC DISC BRAKES ($200 value) + KAWASAKI FRONT SUSPENSION ($300)

  • IN STOCK NOW !

  • SAME DAY FREE SHIPPING FROM Los Angeles

  • WE FINANCE EVERYONE! PAY AS LOW AS $99/MONTH! APPLY WITH KLARNA

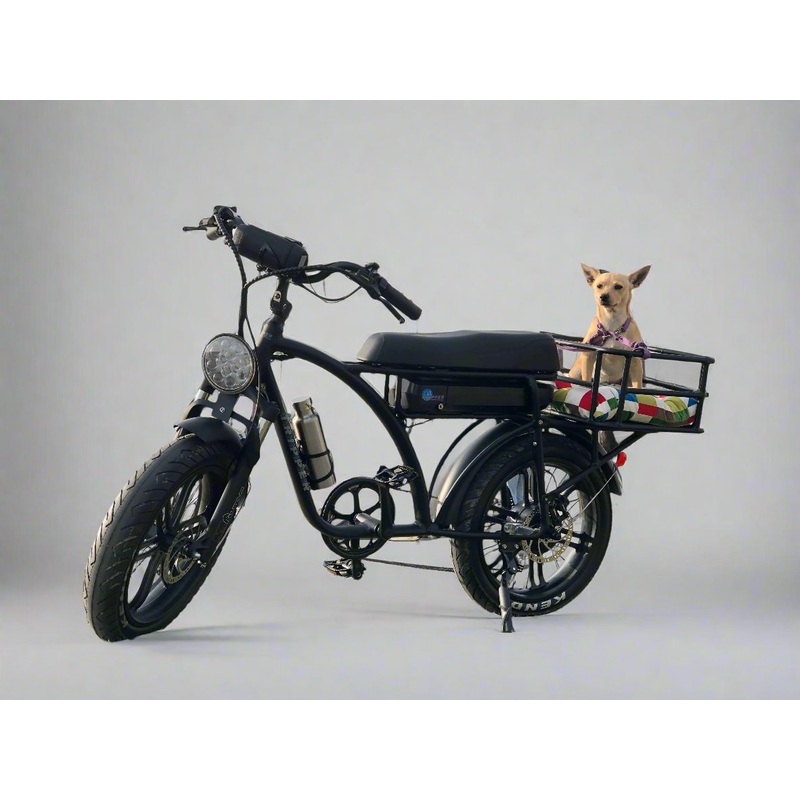
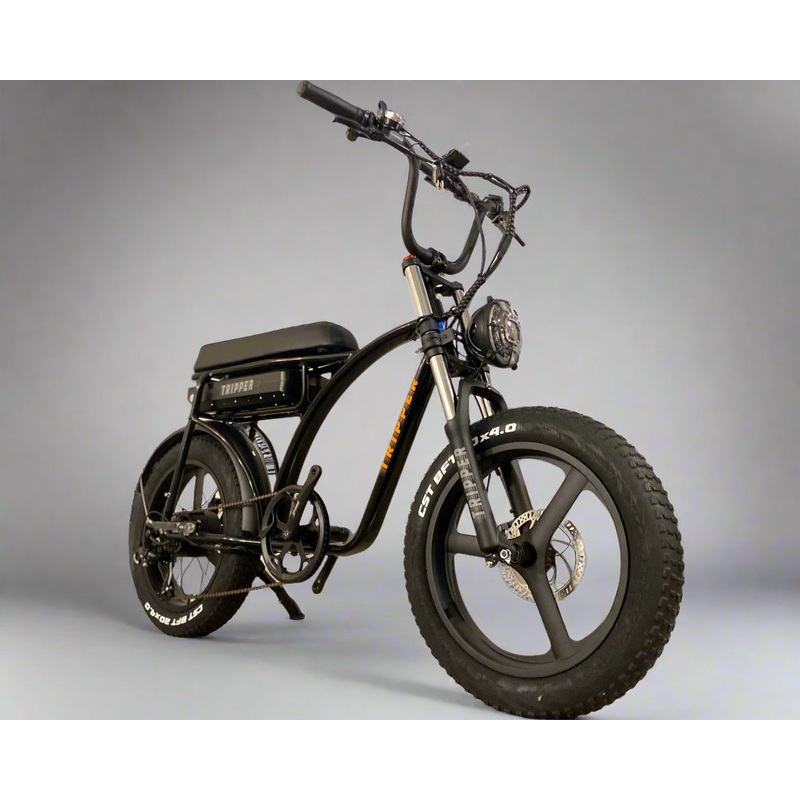
Tripper Falcon Cruiser Electric Motorbike;

Contemporarydesigned electric bike for all ages ,genders. We believe this is the future of Electric Commute. A staggering 50 to 80 Miles Range per one charge gives you the comfort of saving money and going green.

High torque 750W to 1000W rear hub motor provides a stable performance wherever your go.Our strongframe is designed to fit 2 persons and it is easy to carry extras in the back storage space.Performance Motorcycle Tires Fat Tires give you the smoothest riding experience.

MOTOR – i) 48V – 52V / 750W Nominal & 1000W peak – HIGH TORQUE brushless hub motor ; Max Speed 25mph

FRAME –Lighter Aluminumalloy6061 With KAWASAKI MOTORBIKE STYLE Front Suspension System

BATTERY RANGE –50 miles with Throttle – 80 Miles with PAS

BATTERY –Samsung Li-Ion 48V 17,5AH

Note: All battery range is calculated at 155 lbs weight & 17 mph constant speed

THROTTLE:Thumb Throttle (power at your hand is always available)

DISPLAY:Big Stone 4” LCDPanel

TIRES:Kenda KrisadeSport Tires 20″ x 4.0″ with K-Shield Protection

with UPGRADED MAG WHEELS

GEAR SHIFTING:Shimano Derailleur 7-Speed Freewheel with Shimano Push-Buttonshifter

BRAKES:Tektro HYDRAULIC DISC BrakesFront 180mm and Rear Disc Brake 180mm with Motor Cut-Off Sensor in Brake Handles

HANDLEBAR:Adjustable Stem for Comfort – Matte Black Leather Wrapped Handles

SADDLE: Comfort Saddle, Extra soft Memory Foam Leatherette for 2 persons

OTHER STANDARD FEATURES: Giant Headlight , Front and rear Fenders, Phone Holder, Passenger foot rest, Sateen Black Frame, Front Suspension, Integrated Rear light on Battery

WATCH UNBOXING AND ASSEMBLING FALCON II

Falcon 2 Sport & Premium Assembly Full Step Guide

Whats in the box?

  • Allen wrenches (various sizes)
  • Pliers
  • Charger + adapter
  • Phone holder
  • Front headlight + brackets + screws + rubber pieces
  • Mudguard
  • Pedals (WR + WL)
  • Keys for batteries

Extra tool needed:

  • 15mm wrench (for front wheel)

Step 1: Front Wheel

  • Remove plastic protectors from both sides of the rim.
  • Take out the plastic spacer between brake pads.
  • Align the disc rotor carefully into brake pads.
  • Slide the wheel into the front suspension fork.
  • Add the locking bracket at the bottom.
  • Tighten both sides with a 15mm wrench.

Step 2: Front Mudguard

  • Find the mounting hole just above the wheel.
  • Place the mudguard into position.
  • Use Allen wrench + pliers to secure it.

Step 3: Headlight

  • Gather: 2 brackets + 2 bolts + 2 rubber pieces.
  • Place rubber between fork + brackets.
  • Position long bracket in front, small bracket behind.
  • Tighten so long bracket sticks out forward.
  • Align end hole with headlight slot (bend if needed).
  • Tighten with Allen wrench + pliers.

Step 4: Handlebar

  • Loosen 4 screws on the top clamp.
  • Place handlebar on top of the suspension fork.
  • Align it straight.
  • Re-tighten screws evenly with Allen wrench.

Step 5: Display Setup

  • Adjust display angle to your preference.
  • Enter settings switch km miles.
  • Features:
    • 5 pedal assist levels
    • Left side = throttle
    • Right side = red button = headlight

Step 6: Pedals

  • Check markings:
    • WR = Right pedal right side
    • WL = Left pedal left side
  • Screw in and tighten securely.

Step 7: Phone Holder

  • Mount phone holder on the handlebar.
  • Tighten with Allen wrench.

Step 8: Batteries & Charging

  • Front battery = single-prong charging port.
  • Rear battery = three-prong charging port.
  • On rear battery bottom:
    • Switch 1 = power ON/OFF
    • Switch 2 = brake light (keep ON ).
  • Battery options:
    • Use front only
    • Use rear only
    • Use both (they discharge together).
  • Range: up to 80 miles with both batteries fully charged

Thats it! Your Falcon 2 Sport or Premium is now assembled and ready to hit the road.

FAQs

Falcon 2 Sport & Premium Assembly Full Step Guide

Whats in the box?

  • Allen wrenches (various sizes)
  • Pliers
  • Charger + adapter
  • Phone holder
  • Front headlight + brackets + screws + rubber pieces
  • Mudguard
  • Pedals (WR + WL)
  • Keys for batteries

Extra tool needed:

  • 15mm wrench (for front wheel)

Step 1: Front Wheel

  • Remove plastic protectors from both sides of the rim.
  • Take out the plastic spacer between brake pads.
  • Align the disc rotor carefully into brake pads.
  • Slide the wheel into the front suspension fork.
  • Add the locking bracket at the bottom.
  • Tighten both sides with a 15mm wrench.

Step 2: Front Mudguard

  • Find the mounting hole just above the wheel.
  • Place the mudguard into position.
  • Use Allen wrench + pliers to secure it.

Step 3: Headlight

  • Gather: 2 brackets + 2 bolts + 2 rubber pieces.
  • Place rubber between fork + brackets.
  • Position long bracket in front, small bracket behind.
  • Tighten so long bracket sticks out forward.
  • Align end hole with headlight slot (bend if needed).
  • Tighten with Allen wrench + pliers.

Step 4: Handlebar

  • Loosen 4 screws on the top clamp.
  • Place handlebar on top of the suspension fork.
  • Align it straight.
  • Re-tighten screws evenly with Allen wrench.

Step 5: Display Setup

  • Adjust display angle to your preference.
  • Enter settings switch km miles.
  • Features:
    • 5 pedal assist levels
    • Left side = throttle
    • Right side = red button = headlight

Step 6: Pedals

  • Check markings:
    • WR = Right pedal right side
    • WL = Left pedal left side
  • Screw in and tighten securely.

Step 7: Phone Holder

  • Mount phone holder on the handlebar.
  • Tighten with Allen wrench.

Step 8: Batteries & Charging

  • Front battery = single-prong charging port.
  • Rear battery = three-prong charging port.
  • On rear battery bottom:
    • Switch 1 = power ON/OFF
    • Switch 2 = brake light (keep ON ).
  • Battery options:
    • Use front only
    • Use rear only
    • Use both (they discharge together).
  • Range: up to 80 miles with both batteries fully charged!

Thats it! Your Falcon 2 Sport or Premium is now assembled and ready to hit the road.

Who is Tripper Electric Bikes?

Based in Los Angeles, CA, Tripper Electric Bikes was founded by veteran electrical engineers with backgrounds in power electronics, green energy, and electric vehicle standards for last 10 years.

What is the top speed and range of the Falcon II E-Bike?

The Falcon II has a top speed of 25 mph and range of 50 miles with throttle and up to 80 miles per charge with pedal assist.

What is the maximum payload?

The Falcon II can carry a max payload of up to 500 pounds! A true dual-rider electric bike built with an extra soft and comfortable leatherette saddle.

Does Tripper Electric Bikes provide support with parts and accessories?

Yes we have 2 retail locations based in Venice Beach and Orange County to service our riders and customers. We also work with many Bike Shops as service centers.

Reviews

There are no reviews yet.

Be the first to review “Tripper Falcon II Sport”

Your email address will not be published. Required fields are marked *

Related products